Thursday 13 July 2017

How to Format a C Drive with Windows 7

# How to Format the C Drive With Windows 7 #

In Windows 7, you can format your C drive without being required to format all the other disk drives, or partitions, on your computer. The Windows 7 installation disc that was included with your computer at the time of purchase will allow you to format the C drive and erase all your settings, files, and programs on that partition. To format your C drive, you can save and back up your files and programs to an external disc before using the Windows 7 installation discs to complete the formatting procedure.

=> Step-1

Back up and save your files. Formatting the C drive will erase all files, programs, and information saved on the C drive, so you may want to back up any files you want saved.
  • Save your files to an external hard drive or disc, or save your files to another folder on the network, if applicable.


=> Step-2     

Obtain your computer name if connected to a network. After your C drive has been formatted, you may be prompted for your computer name during the installation process in order to reconnect to the network.
  • Go to your computer's "Start" menu, right-click on "Computer," then select "Properties" from the menu that appears. Your computer name will be shown below "Computer name, domain, and workgroup settings."
 

=> Step-3

Insert the Windows 7 installation disc. In some cases, you may have the Windows 7 installation program saved on a Universal Serial Bus (USB) flash drive, which can also be inserted.
 

 => Step-4

Turn off your computer. Your computer will have to reboot in order to read the Windows 7 installation disc.
  • Open your "Start" menu, then click on "Shut Down."
 

=> Step-5

Power on your computer. When your computer powers back on, it will read the installation disc and begin the formatting process.

=> Step-6

Format your C drive. After the computer has recognized the installation disc, you will be prompted to press any key on your keyboard to continue. The installation wizard will then appear on your screen.
  • Select your language from the "Install Windows" page, then click on "Next" to proceed.
  • Read and review the Windows 7 license terms. In order to proceed to the next screen, you will be required to place a check mark in the box next to "I accept the license terms."
  • Select "Custom" when prompted to indicated the type of installation you want to perform.
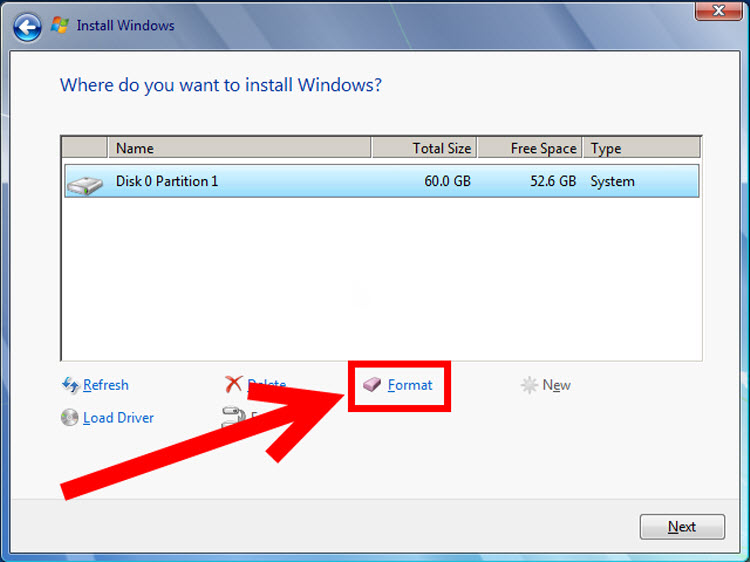
  • Select "Drive options (advanced)" when asked where you want Windows installed. Choosing this option will allow you to select the C drive as the only drive you want to format.
  • Click on your "C" disk drive when Windows asks which partition you want to "change," or install. Your computer will then begin formatting, or erasing, all the data currently existing on your C drive. Windows will notify you when the formatting procedure has finished.
 

=> Step-7

Re-install Windows 7 on your C drive. After your C drive has been formatted, you will be required to re-install Windows 7 to that partition. Click on "Next" after Windows has notified you that the formatting procedure has completed. The Windows installation wizard will continue to walk you through the installation process. You will be prompted for your computer name if you are connected to a network, and for information such as your user name.  

=> Step-8

Restore your saved files. After Windows has completed the installation process, you can insert your external hard drive or disc into the computer to restore your files back to the C drive. 


With the help of this steps you can easily format C Drive on your Computer. I hope it will help you......Thank you for visiting........


My PC Restarting Again and Again

# When your computer reboots itself over and over again #

  • Something is rotten in the state of your Windows PC. Here's how to deal with a computer that keeps rebooting.

  • Follow the steps given below :

  1. Go to the Search tool in your version of Windows, type sysdm.cpl, and select the program of the same name.
  2. Click the Advanced tab.
  3. Click the Settings button under Startup and Recovery (as opposed to the dialog box’s other two Settings buttons).
  4. Uncheck Automatically restart.
  5. You might also want to check Write an event to the system log if it’s not already checked.
     

I hope it will help you......Thank You for visiting......


Saturday 17 June 2017

About Google Products

All Google Products


  • Search

        Get instant answers on the web and on your phone.

  • Maps

        Get GPS navigation, traffic alerts, transit directions, and more.

  • Translate

        Speak, scan, type, or draw to translate in over 100 languages.

  • Chrome

        A fast, simple, and secure browser for the modern web.

  • YouTube

        Discover, watch, and share your favorite videos and music.

  • Google Play Music

        Subscribe to access millions of songs, on demand and ad-free.

  • Chromecast

        Stream movies, music and more from your phone to your TV

  • Google Play Movies & TV

        The newest releases, plus all your favorites, even on your TV.


How to create a Blog on Blogger

How to use Blogger

You can post info and stories with Blogger.
When you use Blogger, make sure you comply with the Blogger Content Policy and Terms of Service.

Create a blog

  1. Sign in to Blogger.
  2. In the top left, next to "New blog" click the Down arrow Down Arrow.
  3. Click New blog.
  4. Enter a name for your blog.
  5. Choose a blog address, or URL.
  6. Choose a template.
  7. Click Create blog.

Change the name of your blog

  1. Sign in to Blogger.
  2. In the left menu, click Settingsand thenBasic.
  3. Next to "Title," click Edit.
  4. Enter a new name for the blog.
  5. Click Save changes.

See how your blog looks

To view your blog, go to the top left and click View Blog.

Change how your blog looks

You can change the design of your blog.

Decide who can see or edit your blog

You can control who has access to your blog.

Explore your blog

You can use the left menu to:
  • View your posts, pages, comments, and statistics.
  • Manage earnings, campaigns, and more.

Get Blogger updates

To get feature announcements, advice, and other info, sign up for email updates:
  1. Sign in to Blogger.
  2. In the left menu, click Settingsand thenUser settings.
  3. Under "Email Notifications," next to "Feature Announcements," choose "Yes."
  4. In the top right, click Save settings.

Troubleshoot issues

If you have a problem with Blogger, see info on troubleshooting issues.

Thursday 2 February 2017

Information about Data Flow Diagram

Data Flow Diagram

  • Definition

     A data flow diagram (DFD) is a graphical representation of the "flow" of data through an information system, modelling its process aspects. A DFD is often used as a preliminary step to create an overview of the system, which can later be elaborated.

    A DFD shows what kind of information will be input to and output from the system, where the data will come from and go to, and where the data will be stored. It does not show information about the timing of process or information about whether processes will operate in sequence or in parallel(which is shown on a flowchart).

     
    Data flow diagrams are also known as bubble charts.DFD is a designing tool used in the top-down approach to Systems Design.Data flow diagrams can be used in both Analysis and Design phase of the SDLC.There are different notations to draw data flow diagrams (Yourdon & Coad and Gane & Sarson[6]), defining different visual representations for processes, data stores, data flow, and external entities.

    External Entity 

    An external entity can represent a human, system or subsystem. It is where certain data comes from or goes to. It is external to the system we study, in terms of the business process. For this reason, people used to draw external entities on the edge of a diagram.

    Process

    A process is a business activity or function where the manipulation and transformation of data takes place. A process can be decomposed to finer level of details, for representing how data is being processed within the process. 


    Data Store

    A data store represents the storage of persistent data required and/or produced by the process. Here are some examples of data stores: membership forms, database table, etc.


    Data Flow

    A data flow represents the flow of information, with its direction represented by an arrow head that shows at the end(s) of flow connector. 


    The DFD may be used for any level of data abstraction. DFD can be partitioned into levels.              Each  level has more information flow and data functional details than the previous level.
   Highest level is Context Diagram. Some important points are:
  •  1 bubble (process) represents the entire system.
  •  Data arrows show input and output.
  •  Data Stores NOT shown. They are within the system.
   
Next Level is Level 0 DFD. Some important points are:
  • Level 0 DFD must balance with the context diagram it describes.
  • Input going into a process are different from outputs leaving the process.
  • Data stores are first shown at this level.
Next level is Level 1 DFD. Some important points are:
  • Level 1 DFD must balance with the Level 0 it describes.
  • Input going into a process are different from outputs leaving the process.
  • Continue to show data stores.
A DFD may look similar to a flow chart. However, there is a significant difference with the data flow diagram. The arrows in DFDs show that there is a flow of data between the two components and not that the component is sending the data that must be executed in the following component. A component in DFD may not continue execution when sending data and during execution of the component receiving the data. The component sending data can send multiple sets of data along several connections. In fact, a DFD node can be a component that never ends.